I messed up - should I start over or can this be fixed? (pics)

FattyMatty

New member
Hey guys -

I bought an '03 Wrangler and found out the one panel is all rusted out. So I cut out the cancer and used fiberglass to fill where the old sheet metal used to be.

I used bondo, glazing putting, and sprayed primer. I was having a REALLY hard time finding highs and lows. I got it as good as I could and figured the base color would fill in the slight "dip" I saw in the repair.

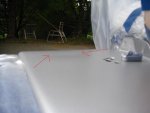
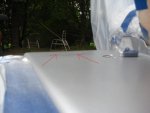
Attached are the pics. I know it's a little hard to see but there is a dip in the paint. It's causing the area that was repaired to look a little brighter than the surrounding paint.

Outside of redoing everything, is there any way to repair this? If I keep adding coats of color could it fill in? (I already put on 10 really light coats and it doesn't seem to be getting better). Is it possible that the clear could fill it in and hide the blemish?

Help! I'm a newb. THANK YOU!
 

Attachments

  • post1.jpg
    post1.jpg
    28.1 KB · Views: 41
  • post2.jpg
    post2.jpg
    30.7 KB · Views: 33

tomsteve

New member
i would say save your paint and break out the elbow grease to get it straightened out. you might want to spray a guide coat before sanding to see what needs to be worked on.
 

FattyMatty

New member
i would say save your paint and break out the elbow grease to get it straightened out. you might want to spray a guide coat before sanding to see what needs to be worked on.

Hi Tom Steve -

I have no prob with putting in the elbow grease, but is this really the best advice? (Im not doubting you, I just want to doubl-check). Remember, I am level right now with one low dip. Sanding down to the low is likely to make everything low.

Is there an alternative where I fill the low? And if so, can I bondo right on top of paint?
 

tomsteve

New member
not sand to make it all low. fill to make it all level. it would be wise to use a rough grit sandpaper to scuff it up. use some polyester finishing resin and spread it out beyond the low spot. use a long board flexible sander to sand and feather it al in. apply 2 good coats of a filler/primer. use some flat black for a guide coat and LIGHTLY spray the area. now go to a finer grit ( 220 ish) and sand some more with the long board sander and look for any left over black. these would be the low spots that need more attention.
 

TAZ

Administrator
Staff member
I agree with Tom.
Just rough the area up, fill it, reblock it and reprime it.

Be sure and get ALL heavy scratches out before you reapply silver. Silver metallic is a very unforgiving color to show scratches.
 

FattyMatty

New member
Thanks guys! I will take your advice and get started now.

Can you give me any tips on clear coat blending? This is my first auto painting but I felt comfortable doing this panel because you only really see the damaged part when you look over top of the car. However, the 2nd half of the panel takes a turn just past the tire; it is this end that is visible when viewing the car from the side and I didn't feel comfortable doing that part. Therefore I figured I would just blend one half of the panel.

I did this by sanding 6" on either side of the repair with 1500 grit until the factory clear was removed. Then I went another foot from there with rubbing compound just so the clear "takes" the new clear better.

So would it make most sense to clear the repair and then slightly mist over the 1500 and compunded area?
 

FattyMatty

New member
Also, how heavy should I go with the clear? I've been doing very light coats with the base color. Do I do the same with the clear?

Thanks again!
 

TAZ

Administrator
Staff member
I'm not for sure which panel you are redoing, but here is how I normally blend a panel.

First, I would make sure that it doesn't make more sense to do the complete panel (blend and reclear panel).
If not, then here is how I would blend.
Do the repair, keeping the primer spot small as possible
Once sanded, you can either use 1500 or 1000 (or both) to sand the area that will contain the blended paint and clear (you do not have to remove the factory clear)
Blend the color
Blend the clear (normal reduction or unless it's a real small spot, then I overreduce the paint a little
Spray 2-3 coats while making the spot slightly bigger each coat.
Over reduce with a slower reducer. Then start working the edges in (I use a blending reducer for this).
Let sit. Then CAREFULLY buff. If you're too aggressive on the buffing, you will burn your blend back, and you may end up redoing it.

If the original paint is real faded, you may want to buff around the area FIRST before painting.
 

FattyMatty

New member
Thanks guys...but now I'm having another issue.

I managed to get the bondo/glazing putty/primer completely flat. I laid the base color and it was perfect.

Today I come out in the bright sunshine and I can see an outline around the repair area. It almost looks like the paint is slightly raised around the border of the original repair. The thing is, I primered about 3 inches all around the original repair, and I blended the paint about 10 inches above and below the repair. This is causing me to scratch my head. How could I get raising like this? And why would it appear after 48 hours?
 

TAZ

Administrator
Staff member
Most likely it's the 'new' primed spot that is showing the edge. This is because you have fairly fresh paint below, with the new bodywork and primer, then even newer paint. so alot of fresh paint on there. SOME of the paint is still softer than the other. This the the coats(s) that give (the coats that you see the ring). This especially shows in lighter color metallics. Of course, silver is your worse.
Best thing to do is if you can see this area after you run a buffer over it, is to sand it down, and dust some silver over it again. Then reclear the panel.
As long as those coats mentioned above were not 'real' soft, it will hold and will not show again.
 

FattyMatty

New member
did you apply primer, then a guide coat and sand?

Hi TomSteve -

I did this for every step. I did my bondo, then guide coated to make it completely smooth and perfect. I filled the pinholes with glazing putty. Then I applied 3 coats of primer and again used guide coats to find highs/lows. It took me 3 nights but I made it PERFECT. I sprayed the base coat and was thrilled with the results, but I had to wait 2 days to clear it. I finally went to clear it today and found these ridges. They are the thickness of a pencil point.

I did use some 2000 dry paper to try to bring down the ridges and then just lightly dust base coat over them. This didn't really work - the ridges are still visible. I didn't want to sand down too much because I was afraid the touch-up spray would not look uniform.

The strange part? It is smooth to the touch, but the ridges are there.

This seems to be some sort of phenomenon with the paint. I am 100% confident it's not my leveling work because as I said, it looked perfect in all light before this.

Is it possible I left a tiny bit of rust and it's swelling again? I cut out the cancer and then sprayed the surrounding metal with a red rust-inhibiting primer.
 

FattyMatty

New member
Most likely it's the 'new' primed spot that is showing the edge. This is because you have fairly fresh paint below, with the new bodywork and primer, then even newer paint. so alot of fresh paint on there. SOME of the paint is still softer than the other. This the the coats(s) that give (the coats that you see the ring). This especially shows in lighter color metallics. Of course, silver is your worse.
Best thing to do is if you can see this area after you run a buffer over it, is to sand it down, and dust some silver over it again. Then reclear the panel.
As long as those coats mentioned above were not 'real' soft, it will hold and will not show again.

Taz, when you say "run a buffer over it," what could be an alternative? I don't have a buffer. I tried using 2000 grit and 0000 steel wool. It looked like the ridges were down but when I painted over those spots the ridges appeared to be there again.

Help!
 

TAZ

Administrator
Staff member
I still think it's from when you redid the spot. If you don't sand the area good enough, or it's not hard enough, then the 'new' paint will do strange things.
When you redid the low, if it wasn't sanded good enough and you just applied bondo/primer over it, the this would be the problem. It has nothing to bite into.

Also, you shouldn't let your base sit too long. There is a window of maximum of time that the clear has to be applied over the base, or you could end up with de-lamination problems.
 

FattyMatty

New member
I still think it's from when you redid the spot. If you don't sand the area good enough, or it's not hard enough, then the 'new' paint will do strange things.
When you redid the low, if it wasn't sanded good enough and you just applied bondo/primer over it, the this would be the problem. It has nothing to bite into.

Also, you shouldn't let your base sit too long. There is a window of maximum of time that the clear has to be applied over the base, or you could end up with de-lamination problems.

Thanks Taz. What do you mean by "hard enough?"

Also, based on what I wrote above, why would you think I just slapped some bondo on? lol. As I said, I literally spent 3 nights just prepping the panel for base coat. My wife thinks I'm nuts at this point - I probably spent 20 hours just on bondo, glazing putty, and primer sanding to make sure it was perfectly flat.

I think you may have hit it on the head with delamination b/c the base has been left exposed to sun and 75 degree days and dark 40 degree nights for 72 hours now.

I'm almost out of base coat and I'm so angry at myself because I finished spraying the basecoat the other day feeling like I really accomplished something and to think I have to sand more I want to smash the stupid panel with a baseball bat. Ugggghhh.
 

FattyMatty

New member
I'm going to take another stab at sanding the tiny ripples, dusting them with basecoat, and then applying the clear this afternoon.

Quick question:

The basecoat has been getting pounced with pollen and all sorts of other crap. A tack cloth alone is not going to clean it. Can I spray wax and grease remover on it? If so, how do I wipe it off? Just with a buffing cloth?

Also, Im assuming there would be some residue from the degreaser on there. Do I then rinse the base coat with water to remove residue?
 

TAZ

Administrator
Staff member
Normally it takes at least a few days for the paint to cure hard enough before putting on other materials. If it's still not hard, then once you put some bondo over it, it's not going to cure proprly. So now you have some fresh materials over uncured paint, so sometimes this doesn't work out.

As far as just adding (slapping) bondo on the paint, what I meant was that if you used anything finer than 800 grit possibly the bondo, primer didn't adhere to it, which will result in what you described.
Actually if could be a combination of both the above.

The basecoat has been getting pounced with pollen and all sorts of other crap. A tack cloth alone is not going to clean it. Can I spray wax and grease remover on it? If so, how do I wipe it off? Just with a buffing cloth?
Also, Im assuming there would be some residue from the degreaser on there. Do I then rinse the base coat with water to remove residue?

You can just trying the 'wipe on, wipe off' with the wax and grease remover. If this doesn't work, but resand with 1000 grit or so, add a couple light coats of base, then clear about 5-10 minutes later.
 

FattyMatty

New member
Shoot Taz, I wish I had talked to you first!

I used 1500 on the bondo/putty before I sprayed the primer, and I used 1500-2000 on the primed area before I sprayed the base. I assumed the smoother the primer the better the end result.

So what happens now? It's only rippling at the edge where the primer met the old paint.

BTW, thanks for talking me through this Taz!
 
Top