Need some help with a Harness Racing helmet paint & pinstripe project

freddyguy1

New member
Hi everyone,

I need a little bit of help. I'm relatively new to the world of working with airbrushes, pinstripes, etc., etc., and, I have a couple of questions concerning a project which I am working on.

The project is the repainting and putting graphics on a Harness Racing helmet, for a buddy of mine.

A little about what I've done so far:

I started out with a helmet which had not previously been custom painted (just the plain white background as purchased initially). After ruffing up the surface with sand paper, I then purchased a spray can of blue metallic paint, mixed by a local automotive paint dealer, and sprayed the helmet with that. I then started to airbrush on some simple graphics using acrylic paints and then used some pinstripes in different areas on the helmet.

I am getting close to the point where I want to finish the project by clear coating the helmet.
My questions are:

1) It seems to me that I read somewhere that pinstripes used in this manner need have a "hardener" applied over them before the clear coat is applies. Is this a fact? If so, what kind of Hardener would you recommend, and, will it have any adverse affect on the painted surfaces?

2) My other question is, as I've used acrylic paints and pinstripes (which may or may not have a coating of hardener if required), what kind of clear coat should I use? Also, should the helmet be sanded with a fine grit sandpaper prior to clear coating?


Thanks in advance for any assistance that you can offer.
 

JT Airbrush

Member
What kind of paint did you use for the pinstripes? If it's an enamel like 1-Shot, then you should add a hardener. Be careful clearing over 1-Shot, even with the hardener it can wrinkle. Mist on the first couple of coats of clear, then spray progressively heavier coats. I just finished painting a harness helmet and used a different approach then what you explained, but there's always more than one way to paint these things.
 

freddyguy1

New member
What kind of paint did you use for the pinstripes? If it's an enamel like 1-Shot, then you should add a hardener. Be careful clearing over 1-Shot, even with the hardener it can wrinkle. Mist on the first couple of coats of clear, then spray progressively heavier coats. I just finished painting a harness helmet and used a different approach then what you explained, but there's always more than one way to paint these things.


Hey JT and thanks for the info. The pinstripes that I used are the stick on type not painted on. With these types of pinstripes, is there any prep that they need before the clear coat?

I had thought that the thing that I had read about was using a hardener on the stick on pinstripes but, maybe not. Maybe they were talking about painted stripes. Although, you would think that the vinyl stick on's would need something or, wouldn't they wrinkle??

Cheers bud!
 

JT Airbrush

Member
Freddy, I don't use vinyl pinstripes on any of my work, so I can't say how it will react to the clear coat. I do think you will feel the vinyl under the clear and I'm not sure how it will hold up in the long run. You know if this approach doesn't work out and paint or clear starts to peel or fail, you'll have quite a mess that will have to be completely sanded off to start from scratch. I airbrush and pinstripe professionally and to be honest it sounds like you're trying to do something you're not familiar with. Please don't take offense and I think it's great you're doing this for a buddy and I'm not saying not to give it a try, but maybe practice on some metal panels or old helmets first.
 

freddyguy1

New member
Hi JT thanks very much for the advice and NO offense taken at all. You're exactly right, I'm not familiar with some of the things that I'm attempting to do. I've never done a project like this before and, I admit that I'm struggling a bit. However, I think that your advice is solid so I think that I'm going to remove the pinstripes that I have on the helmet now, tape it off and then airbrush the stripes that I want.

I should have done this in the first place, but, I was having problems with the paint weeping under the tape and it was getting pretty frustrating. So, I figured that I could make it easy and just use the vinyl pinstripes. I kind of thought that they would be felt through the clear coat but figured that maybe 2 or 3 coats might take care of that. That's when I went looking for what had to be done to put clear coat over the stripes and, again, saw somewhere that a hardener would be necessary.

I'm a pretty artsy kind of guy. I am a painter, I love to do woodworking projects and I'm a musician, but, I guess that we cant' all be good at everything. I've been kind of flying by the seat of my pants on this one.

By the way and just a question: I've been using the 3M type of painters tape to seal of the areas where I want to airbrush. As I said, I taped it off very well and make sure that the tape is really tight to the surface, but, I still get bleeding under the tape. Do you have any suggestions on what I can do to stop this problems. I had spent a lot of time taping, painting and waiting to dry, only to find that the edges of what I've painted are not crisp and clean.

I'm going to attempt to add a couple of photos of what I've done so far. Hopefully and if you don't mind, you might give me some advise on where I should go from here. I'm not trying to make this helmet the most spectacular looking thing on the planet (as you will obviously see from the pics) because it's not going to be seen on the "world stage", just around a few small race tracks, and, from a distance, anything usually looks pretty good anyway. LOL!!

Hopefully, and if you don't mind, maybe you can provide me with a bit of guidance from here with where to go next and to answer a question for me. That being, and as I mentioned before, I'm having a bit of trouble with paint bleed from under the masking tape. I'm using the 3M of FROG types of painters tape and, after applying it to the surface, I make sure that it's at tight and smooth as possible. However, when I use the airbrush or even a small art brush, I apply the paint and wait until it's dry, but, when I remove the tape, there is usually SOME paint bleed in various areas. Is there any way that you can suggest that might prevent this from happening, and, when if it does, what do you do with the bleed. I'm trying to make my lines stand out and be as crisp as possible. I'm not using the airbrush to do any fancy effects, only to make the layer of paint as smooth as possible, which is difficult when using an artists brush.

I was going to have a small, fine decal made for the front of the helmet, but now that doesn't seem like a good idea as it would probably be made from a similar material as the pinstripes. The decal was to be 3 small intersecting horseshoes, forming by buddies initials (CM). If you can picture it in your mind, the "C" would be the first shoe and look just as the original letter C. The 2 other shoes will be turned on their sides, laid on top of each other so that they intersect and form the letter "M", then laid over and intersect the original letter "C". The idea of turning the 2 horseshoes on their sides is because of the older superstition, "If you hang a horseshoe upside down (meaning with the opening facing down), your luck will run out". This is especially the case in horse racing.

Anyway, thanks for everything and reading my ramblings.

Cheers, and have a great weekend.


Mark

PS: I'll have to send another reply with the last 2 pics.
Before primer.jpgAfter primer.jpgAfter Painting.jpgFirst graphic.jpg
 

JT Airbrush

Member
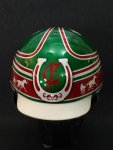
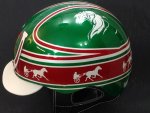
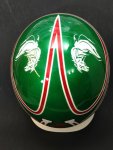
I'm not sure what 3m tape you're using, but to lay out graphics, I use fine line tape. My fine line tape of choice is FBS, but the blue 3m fine line is pretty good too. 1/8" fine line is usually good for everything. Once you lay your fine line, you'll have to mask the rest of the helmet with regular masking tape. I use 3m 233+ green masking tape. To prevent bleeding under the tape, you can spray another coat of the base coat color after the fine line is put down. If there is any bleeding, the base coat will fill those voids and blend in with the rest of the base coat. To paint the logo you described, you will need to get a stencil cut from vinyl paint mask. This is a special type of vinyl that can easily be removed after you spray your paint through it. Most sign shops have the paint mask and can cut it for you, but the logo has to be designed in a vector based program like Adobe Illustrator first. Again, a sign shop can do this for you, but it can get pricey depending on the complexity of the logo. Also, you didn't mention what type of paint the blue base coat is? Although you can spray water based paint on top of solvent paint, I prefer not to intermix. I use either all solvent based paint or all water based paint. You didn't mention what clear coat you intend to use, but I hope its an automotive 2k urethane clear and not some rattle can stuff. Rattle can clear won't hold up very well on a helmet. As a matter of fact, I use a high impact clear for helmets since they tend to take more abuse than regular automotive surfaces. As you can see, it's a bit complicated painting helmets and by the time you purchase all the professional grade paints and materials, you'll be in it for quite a bit of coin. Here's the harness helmet I recently painted. It's red and green candy over white pearl base. Everything is painted. No vinyl stickers were used. The design was created by laying out fine line tape and the artwork and logo were created by spraying the paint through vinyl paint mask stencils that I designed in Adobe illustrator. I have my own vinyl cutter and cut all my own stencils when necessary. Hope this helps a bit. Let me know how it goes.
 

Attachments

  • HarnHelLoRes1.jpg
    HarnHelLoRes1.jpg
    33.6 KB · Views: 1
  • HarnHelLoRes3.jpg
    HarnHelLoRes3.jpg
    48.3 KB · Views: 2
  • HarnHelLoRes4.jpg
    HarnHelLoRes4.jpg
    42.3 KB · Views: 1

freddyguy1

New member
Hey JT,

WOW!! NICE job on the helmet. Obviously, you know exactly what I'm working on.

Thanks for the great info and advice, it will be very helpful as I go along. I'm certainly glad that I came on here and asked for help. I think that my project would have turned out pretty poor if I hadn't. I think that with everything that you've provided me with, I can go forward and maybe make this project come out much better for sure.

I just have one question about what you've said about preventing the bleeding under the tape. I just want to make sure that I'm understanding you completely when you said to "spray another coat of the base coat color after the fine line is put down". What I take from this is, once I've removed, for example, the white pinstripe and then tape the area off to paint the white stripe, it would be a good idea to spray and let dry, a coat of the blue base color right over the fine line tape which should prevent the white paint from bleeding under the tape because the blue has already created a barrier? If this is correct, it certainly does make a lot of sense.

As far as the logo is concerned, you're right, it can be pretty pricey. I have already checked with a sign shop and they told me that it would cost approx. $75.00 for them to design and cut it, as apposed to $7.80 if I provide them with the design. I've tried designing it in Adobe Photoshop Elements and another software called GIMP, but I can't seem to be able to do the overlaying of the horseshoes properly. This type of software seems to be quite a challenge for a 60 yo, old fart like me. LOL!! However, I'm going to keep trying. I don't usually let much of anything defeat me.

To answer your questions about the types of paint that I'm using, at least I WAS smart enough to figure out that I couldn't use different mediums. So, the base (blue) color is a product called "Pro-Form, Pro Pak FV16, Custom Filling System Waterborne Basecoat Blend", which I had made up in a spray can at a local automotive paint dealer. Then, for the other graphic colors, I'm using "Createx Acrylic Airbrush Colors". So, I think that I'm safe there as both are water based. I hadn't put much thought into the clear coat at this point, as I'm not finished putting the details on yet. However, I'm glad that you brought it up and provided me with the great info. I probably would have ended up with the wrong stuff and REALLY screwed things up. The 2k urethane clear that you mention, in what form is that available? Is it in a spray can, bottled for airburshing, or .....?? Is their a specific brand that you use and I imagine that it would also have to be water based since I'm already using water based paints?

Luckily, I hadn't used a whole lot of pinstripes so it was pretty easy to remove and now I can replace it with paint. If my project turns out HALF as good as yours looks, I will be happy and I know that my buddy would be too. Although, anything would be a heck of a lot better than what he's using now.

Once again, thank you so very much for all this great help, advice and instructions.

By the way, for some reason the site won't let me upload the other 2 pics that I was going to send, which would show you where I'm at right now.

Have a great one my friend.

Cheers,

Mark


JT Airbrush

Member
Mark, yes, spraying the base coat over the fineline tape forms a barrier that stops the other colors from bleeding. I'm not familiar with the Proform paint, but if its a waterborne automotive paint, then I'm sure its good stuff. Createx is great paint, but for hard surfaces like a helmet you should use the Wicked or Auto Air line of paints from Createx and not the basic Createx, which is made for T-shirt airbrushing. For clear coat you need to use a urethane clear. There are no good water based clears available yet. You can use Spraymax urethane clear which is available in a spray can. Make sure you wear a respirator when spraying the clear as its very nasty stuff.

Try using Inkscape to create a vector based image of your design. Gimp won't really work as its more of a raster based program. Inkscape is a free open source program like Gimp.

You can see more of my work on my website: jtairbrush.com and my Facebook page: www.facebook.com/jeff.simon.5268
 
Top