Newbie would like some help getting started

DrGrafix

New member
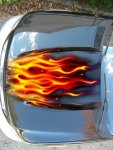
I had a semi-local friend who is very experienced in painting/airbrushing who was supposed to help me painting some flames on my F150 Lightning truck. Unfortunately, he bailed on me and I'm thinking I have to give it a try on my own as my budget is very limited. I've watched numerous YouTube videos but most seem to assume that you're already an experienced painter. My paint scheme has been narrowed down to an area in the center of my cowl hood (truck is black) and then maybe I thought I'd do a slightly different "repeat" on the fiberglass bed cover. I've attached a photoshop paste up of what I'd like to do, its not that great but you should get the idea:

So my questions are numerous LOL... and maybe someone will fill in the blanks and this winter I can fool around enough to feel confident and try the real deal in the spring. If there's a really good tutorial and a link by all means point me there. But here are some questions:

Is it better to work with a "frisket" paper to outline flames or would it be better to simply draw the flames on the scuffed paint and then mask?

What kind of acrylic automotive paints work well in an airbrush if you're not going with HoK, and do you mix them the same as if you were using a regular detail gun?

Can I use an ordinary compressor or do I need to buy a airbrush-specific compressor. I have a regular belt-driven Campbell-Hausefell 30 Gallon unit in my garage, and a small twin-tank Husky portable in my woodshop.

I bought a airbrush at Harbor Freight to play with, but I know I'll eventually need a better one. Without breaking the bank... whats a decent airbrush to look for on eBay?

Is it worthwhile to buy/borrow a book or DVD on automotive airbrushing tips/techniques?

My woodshop isn't huge but I do have a big JET air filtration system as well as a JET sawdust cyclone... so its relatively clean for my "learning" experience. Plus its heated, well lit, and I'm thinking I can just buy some sheet metal pieces to practice on, and then sand and re-use as needed. But any/all help would be appreciated.

Mike
 

Attachments

  • RealFlames-00.jpg
    RealFlames-00.jpg
    65.9 KB · Views: 26

TAZ

Administrator
Staff member
The flames on the image you posted appears to be free-handed. It sounds like you are leaning toward something like this. If so, you'll need to practice free hand. You can do it on those panels that plan on getting.

You can use any basecoats and clearcoats you would like.
You can over-reduce or under-reduce if needed. A little over-reduced paint works best in airbrushes.
I doubt that job was done with an airbrush though.

I have Iwatas in my shop, but whatever you like as far as airbrushes go.

Your compressor should be all right for the flames. Make sure you have filters on the compressor so when you clearcoat the hood, you don't get fisheyes or something else that could go wrong.

Wouldn't hurt to get some DVD's before starting. I definitely suggest practicing first.

When you do your hood, you will need to prep it first (you can just sand with 1000 grit wet first). You'll want to get the hood dull before any painting. This will make all paint including clearcoat adhere to it.
 

DrGrafix

New member
The flames on the image you posted appears to be free-handed. It sounds like you are leaning toward something like this. If so, you'll need to practice free hand. You can do it on those panels that plan on getting.

I think they still need to have a sharp outer edge though, which means tape the outside edges and work the inside freehand?

You can use any basecoats and clearcoats you would like.

For practice... What are good, inexpensive brands of automotive-type paint I can buy in small quantities that are compatible with airbrushes?

You can over-reduce or under-reduce if needed. A little over-reduced paint works best in airbrushes.
I doubt that job was done with an airbrush though.

I have Iwatas in my shop, but whatever you like as far as airbrushes go.

Your compressor should be all right for the flames. Make sure you have filters on the compressor so when you clearcoat the hood, you don't get fisheyes or something else that could go wrong.

Basically you're talking about some small water separators?

Wouldn't hurt to get some DVD's before starting. I definitely suggest practicing first.

When you do your hood, you will need to prep it first (you can just sand with 1000 grit wet first). You'll want to get the hood dull before any painting. This will make all paint including clearcoat adhere to it.

Yeah... my painter buddy had said I could use scotchbrite pads to scuff the clear enough to be able to sketch out a pattern, and also get the paint and tape to stick.
 

TAZ

Administrator
Staff member
I don't know about that. They look pretty fuzzy to me. If you are more comfortable to do them when masked up, this would probably be the way to go.

Water separators, filters, whatever you can buy to keep moisture and oil out of the lines.

Should watch using a scotchbrite to sand a surface though as these are not as consistent as the particles on a piece of sandpaper. You'll end up with inconsistent sand scratches. Some of which may show up through the clear. No problem if you plan on respraying the base though.

Let us know how it goes.
 

chopolds

Member
Looks like a combination of masking, templates, and freehand in an almost 'realistic flames' style.
First, masking... I like to use 1/8" Fineline tape to define the flames. Easy to get a good flow going, and you can see the design work itself out as you go, and you can easily correct it. Once it's all Finelined, then you can either use regular masking tape, or frisket. The Fineline will help you not cut the car's paint, as you razor off the frisket. Just drawing on frisket and then cutting, increases the odds of disturbing the original paint. Takes a steady hand and some experience not to cut too deep!
Then, templates....to makes edges a bit less defined that a hard line that masking makes, yet not as fuzzy as freehand airbrushing, use acetate cut into swoopy curves and lightly hold them against the area you wish to paint, and shoot the edge. You can also use common photo printing paper to make your own templates, or buy pre-cut ones form any airbrush dealer, many different styles available.
Freehand, is airbrushing freehand! The farther away you are, the less distinct the line, you can see that in the darker colors in your photo. Also good for smoke trails off the flames. PRACTICE!
I'd also recommend getting a detail gun, or jamb gun, as an airbrush is pretty limited to the width of a paint pass. A jamb gun will make a wider pattern, fill in easier for large areas, as well as even being able to do your clearcoat work when finished, thoug a full size gun will be faster. I use a jamb gun most of the time with flames, only doing highlights with an airbrush, unless I'm doing small stuff, like bike tanks.
 
Last edited:
Top