You are using an out of date browser. It may not display this or other websites correctly.
You should upgrade or use an alternative browser.
You should upgrade or use an alternative browser.
Outlined flames w/ an Airbrush
- Thread starter 801Rider
- Start date
801Rider
New member
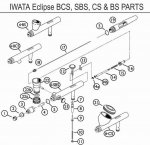
Thanks, it wound up coming out pretty good. That is my first go with one on an actual project that I was getting paid for lol. I've used one before but not for anything with that long of lines. Stupid trigger keeps getting stuck and allows air to go through. Any tips for that? Its an Iwata Eclipse.
Pics of the fender after wetsand and buff


Pics of the fender after wetsand and buff


Brian Dee
Super Moderator
very nice bike. Your flames are in keeping with the style of the bike. Good design. Sounds as though the air valve in your AB is a little gummed up. it can be removed from the bottom, (where the hose connects to it) Be careful though there's a little spring in there that has a habit of flying accross the room. Clean the valve,and while it's apart might as well replace the little o ring. Apply a little AB lube on it and your good to go. This diagram might help
Brian.
.
Brian.
.

Last edited:
Kong
New member
For whatever its worth that little O-ring in the air inlet valve in your airbrush isn't available by itself, you have to buy the entire valve, which is relatively cheap. You have to be careful when cleaning the gun not to soak the gun such that the air valve is immersed in L-thinner. The O-ring swells up and stops the valve from moving properly. You can take it apart and just lay the little O-ring out in the sun for a couple of hours and it will shrink back down, but that fix only lasts for a couple of uses and it will start sticking again. The drying out thing just gives you some time to order a new air valve. The part number on the valve is "1 505 1", I think the spare one I have here cost me something like $12, but I really don't recall exactly.
DonDada469
New member
Hey 801, looks like I'm doing a similar project as yours. I just practiced my marbeling and am stoked with my first attempt. When I have time the bike will be next.
My next stage is learning how to do the flames like you did with the airbrush on the black bike. That's the style I want to achieve, so if you don't mind, can you lay out the steps you took to get it done.
BTW, truly admiring your work brother.
(My plan is to do the whole bike with the orange marble effect, and attempt to do the ghost flames like yours in a BBS gold)
801Rider
New member
So when I initially did that front fender, it was just a black gel coat (if I recall correctly).
1) Scuffed it with a red scotch pad.
2) Sprayed the black base
3) Sprayed the metallic mid coat
4) Clear
5) Wetsand
6) Lay out the flames
7) Airbrushed around the tape out line. Pattern was half on the flame, half on the tape.
8) Clear
9) Wetsand and buff
Hope that answers your questions
1) Scuffed it with a red scotch pad.
2) Sprayed the black base
3) Sprayed the metallic mid coat
4) Clear
5) Wetsand
6) Lay out the flames
7) Airbrushed around the tape out line. Pattern was half on the flame, half on the tape.
8) Clear
9) Wetsand and buff
Hope that answers your questions
DonDada469
New member
Awesome thanks man.
Just wondering if you used the HOK tangerine the same way I did. I used the Koncentrate so I more or less made a tinted clear, let it cure and then cleared over that. Is that what you did too?
I posted the pic of my cellphone case in the other thread about your marbelize attempt.
Just wondering if you used the HOK tangerine the same way I did. I used the Koncentrate so I more or less made a tinted clear, let it cure and then cleared over that. Is that what you did too?
I posted the pic of my cellphone case in the other thread about your marbelize attempt.
DonDada469
New member
Just noticed, you don't spray in a booth?


